Last year, we tried and failed to establish a dye garden at the Yorkshire Museum of Farming. Our main problem was slugs. Big slugs. Lots of slugs. Nuclear bombproof mutant slug pellet-survivor slugs.
I’ve been an organic gardener all my gardening life, after stumbling on a dog-eared copy of Laurence D. Hill’s ‘Organic Gardening’ that unaccountably was amongst my dad’s books.
The organic way to deal with slugs are beer traps. AKA ‘slug pubs’. I have done this and found it works, in the past. But last year’s slugs were the leviathans, behemoths and juggernauts of the slug world and not actually living at the Museum meant we couldn’t be on guard, at dusk – when the slugs come out…
Although I continued gardening organically at home, at the dye garden in the Museum of Farming, it was more like all out war with the monster slugs. They ate everything in their path – our weld, woad and flax. All we were left with were some transplanted, already large madder and goldenrod plants, kindly donated by a member of the York Guild of Spinners, Weavers and Dyers. Every single thing we planted from seed, ended up in a slug.
Same with my plants at home. As belt and braces, simultaneously with planting woad, weld and flax at the Farming Museum, we planted it here in our garden. Everything here was eaten too. It was the worst year for slugs I have ever known.

I have grown woad, in particular, for years but on and off and not recently so was starting from scratch. We got seeds from Kings Seeds and Teresinha at woad.org.uk. Both reliable sources of good seed.
I bought my first ever woad seed 30 years ago from Suffolk Herbs, who are now part of Kings Seeds, when I first read ‘A Dyer’s Manual’, by Jill Goodwin. This remains my favourite book on dyeing, ever and despite dyeing since the 1980s, I still refer to it constantly. Somewhere, in a garden in California, South Birmingham, where we lived in my early woad-growing career; they must wonder what that weird ‘weed’ is or maybe it became a garden escape in the nature reserve behind our house. Two hundred years from now, archaeologists will find woad pollen in the ground and wonder if there was a woad industry there.
It didn’t help that we had started the Museum garden, digging a bit of waste ground that is heavily sheltered, and previously covered in couch grass and nettles – so Slug Nirvana. It was never going to be easy but the site is lovely, and has the afternoon sun.

We call it the ‘dye garden’ rather optimistically. It is, in fact, more of a dye border. I like to think of it as analogous to medieval strip farming. We hope to end up with a long strip of dye garden, and if we can manage to hold down the couch grass and slug attacks, this year, we hope to keep expanding it til we can be self-sufficient in woad and weld.
We will keep digging up couch grass that returned over the winter, and reclaiming garden well into May, as and when we can. We are growing the woad and weld at home in biodegradable newspaper pots – because with its tap root, woad really doesn’t like being transplanted, but we think it may stand a better chance against the slugs if grown to a decent size then transplanted. I’ll blog our progress (or the slugs’ victory) over the next few months…
Last week, I was at the Museum, starting to reclaim our dye garden. We will sink some substantial planks of wood all round the edges, when complete, to help keep out the couch grass as it re-invaded totally after slugmageddon.

There won’t be much to look at – apart from the madder and goldenrod, for a couple of months. But we hope by summer to have an interesting garden; growing a few of the commoner dye plants like weld, woad, madder, dyers’ greenweed and some later ones like goldenrod and coreopsis, inspired by the beautiful dye garden at Armley Mills, in Leeds.
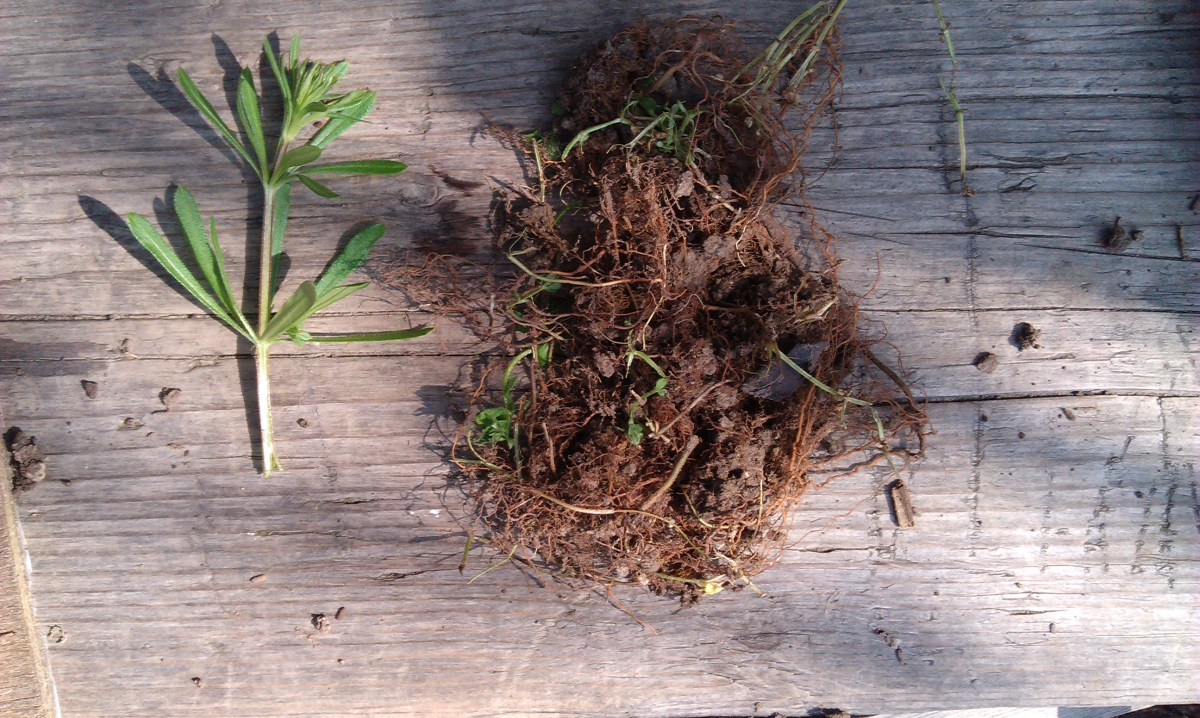
Whilst I was clearing the weeds, it occurred to me that the small patch of goosegrass (cleavers, or galium aparine) might be worth exploiting. Whilst some weeds yield decent enough dyes, they were usually not used on any large scale because better dyes existed. Anything with the suffix tinctoria is usually your clue. But that’s not to say that folk didn’t dye at home using what was to hand, small scale. Your soil would be needed for food so too valuable a space, for most people, to use it for colours for your clothing. But who’s to say that “weeds” weren’t exploited? Poorer people wore nettle fibre instead of linen from flax. There are 19thC accounts of Dalesfolk dyeing their own stockings, buying logwood from the mills in small quantities.
Very few dyestuffs give a true red. The hated weed, goosegrass, happens to be in the same family of plants as madder (rubia tinctoria), the only source of true reds in Europe, for more than a couple of thousand years, til some New World dyes came along. Other related plants include Lady’s Bedstraw (Galium verum) and Hedge Bedstraw (Galium molugo). Only madder was commercially viable as it has much bigger roots than the others. But chemically, the colour you get is similar.

Like madder, the bedstraws and cleavers, need to be left in the ground several years because what you are after are not the fine, hair-like roots immediately under the soil but the deeper, red or brown coloured, woody roots that look a bit like twisty worms. This is where the colour is. In the case of goosegrass, these are few and far between and hard to find. After half an hour trying to find as many dye-bearing roots as I could, I had the princely amount of 5g of root – which hints why madder, and not goosegrass or the bedstraws, were commercially viable. But 5g is enough to do a test dye of 5g of silk and 5g of silk goes a long way…
With unknown dyestuffs it is a rule of thumb to work with a 1:1 weight ratio.
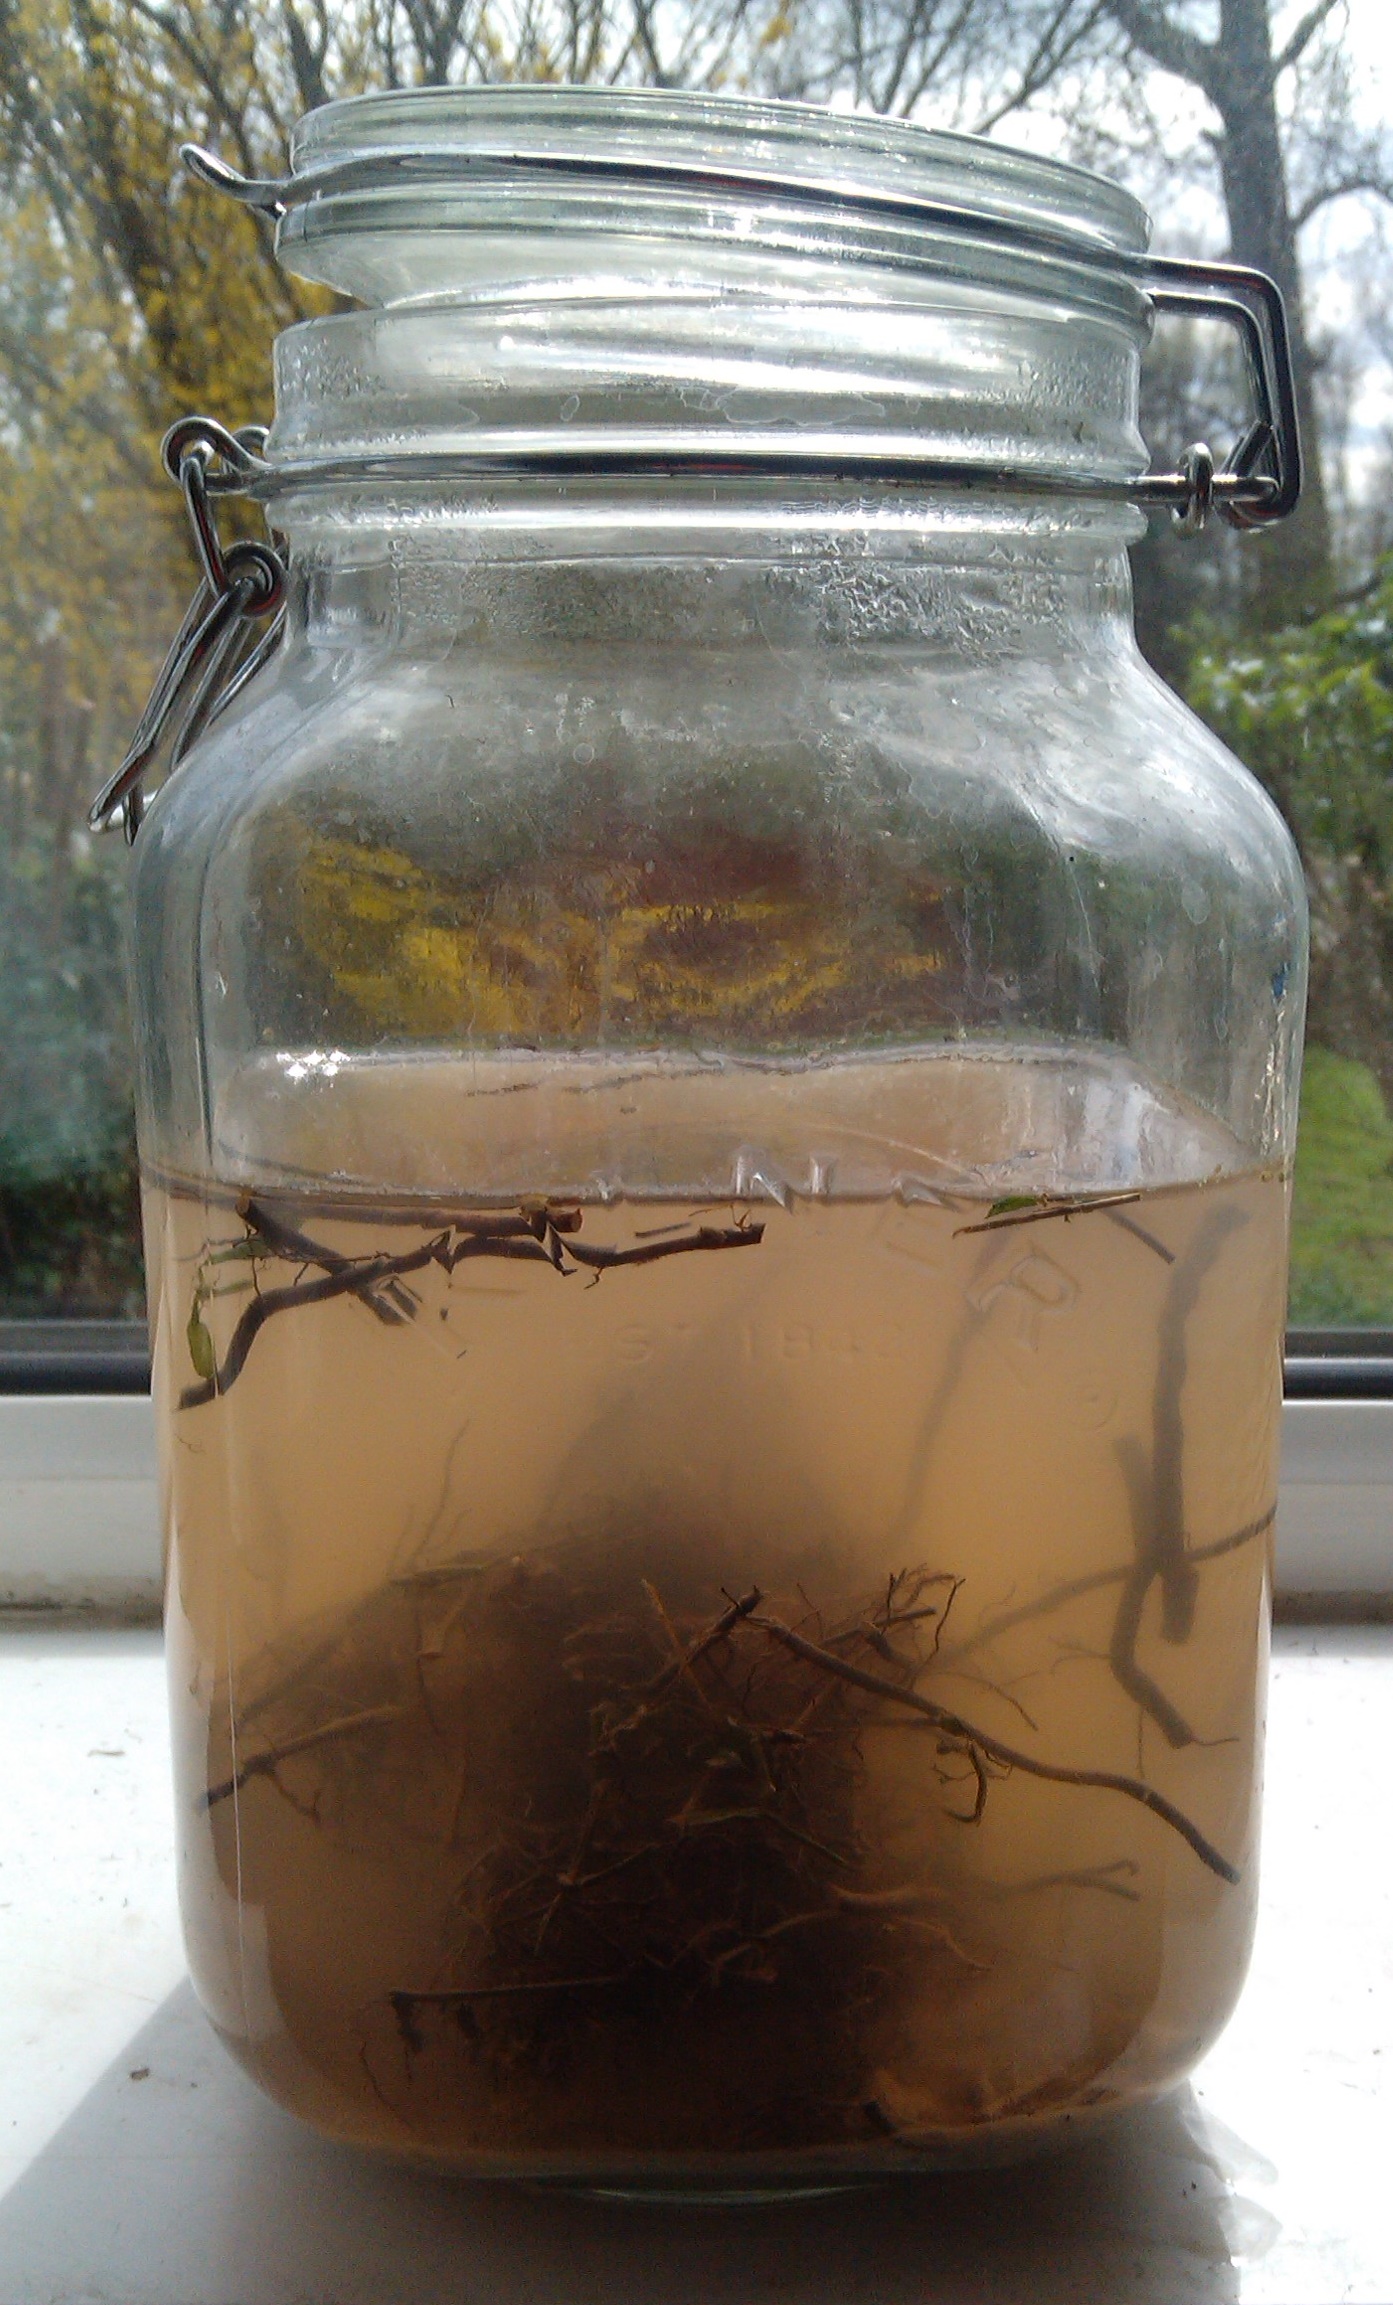
It is not worth using electricity to dye with 5g of dyestuff the fast/usual way. So this is what I have done. It’s a good method for testing small amounts of unknown dyestuff and not risking much fibre. It is also low impact on the environment.
I used chalk here as you do that with madder. It can be omitted for other weed roots, like docks, nettles, brambles, etc – unless you are experimenting with pH levels and their effect on colour. In which case – fill your boots. I have got decent dyes from nettle and dock roots, in the past. But would only bother if I had a patch of nettles or docks to clear.
I used to use this method of dyeing a lot with my classes of primary aged kids – our classroom must have stank like the Science Experiment From Hell, sometimes! But the kids enjoyed predicting what colours they’d get.

Low Impact Test Dyeing
Use this method with other weeds/roots.
Hedgerow Red (Goosegrass, Lady’s or Hedge Bedstraw)
You Need…
Kilner Jar (or any wide-mouthed glass/ceramic vessel)
Pinch of alum
Ground up uncoloured chalk (I used half a piece of tailor’s chalk as that was what I had to hand)
5g (or whatever you dig up) weed roots (in this case, goosegrass)
Same weight as above of silk or wool
Hard water
Method
Dig up roots. Leave to dry, if possible, whilst outside so you can get as much mud off as possible.
Rinse roots thoroughly. Dry on a sunny windowsill, or wherever works best for you. When dry, weigh. Now weigh out equal amount of fibre. I’m using silk as it takes dye well. If you have pre-mordanted fibre, leave out the pinch of alum. If not, a surprisingly small amount of alum should be enough to fix dye.
Chop up roots into small pieces, so the colour can bleed out easier.
Grind up chalk and dissolve, with alum, in hot water. Place in vessel.
Bring up level of water to about 2/3rds. Shake again.
Drop in roots. Shake or stir a la James Bond.
Drop in thoroughly wetted-out fibre.
Cover, but don’t fasten lid down tight (it could ferment and explode!)
Re-visit your experiment daily over the next few days/week; turning over the fibre, and giving things a bit of a stir to distribute the colour evenly. When desired depth of colour is reached – voila. Take out, wash and rinse. I have found in the past that this pinch of alum is usually enough to fix the colour if dyeing such minescule amounts. You have dyed a small amount of fibre, without using much fuel and without risking a colour you dislike on a lot of fibre. If you like the results, you can dye more of it, conventionally. If you hate it – you have only lost a few grammes of fibre, a bit of time and you can always over-dye later, with a strong dye pot.

10 replies on “Down The Slug Pub and Low Impact Test Dyeing”
Hi. What’s the purpose of the chalk?
Great article👍
LikeLike
Alkalinity, I’m guessing!
LikeLike
Oh! Lol. I live in an area with hard water so maybe I won’t bother with that step👍
LikeLike
Slugs were a major problem here (Somerset) last year too. If you can find it at reasonable cost it’s worth trying the nematode worm treatment at this time of year because it knocks their numbers down just as they are starting to become really active.
I love Jill Goodwin’s book too, I rate it far above most other books on the subject.
LikeLike
Hi Pat – Nice to see you here! Yes, I will look into the nematode treatment – anything that makes a difference! Have just planted a bit of woad today (late, I know) and don’t think I can bear to see every single seedling eaten, again.
LikeLike
Excellent post. We had enormous slugs on the allotment last year too- must get my seeds in for this year, I’ve been very remiss.
LikeLike
When I was a kid in South Wales, goosegrass was known as ‘sticky bombs’ and we would pull it up and throw it at each other! I’m glad to know it’s good for something other than throwing at your friends or feeding to geese. I think we called goosegrass “sticky buds” in Yorkshire. Might be remembering that wrong.
LikeLike
lloeren, did you do “itching powder”? That was the fluffy seeds from inside rose-hips. We used to rip rose-hips open, then stick it down eachother’s backs. So cruel.
LikeLike
I wonder if you have tried copper tape? I have thousands of slugs too – they also love to dine on whatever I choose to plant on their patch. However, the copper tape seems to stop them in their tracks…. I also found that larger plants were less vulnerable which is what you are planning to do… so, I am growing spinach seedlings to a fair size before popping them out into the danger zone.
I have some Ladies Bedstraw I planted six years ago in my garden – now I know that I need to look for the larger roots for that elusive dye colour. Sadly that might mean losing the whole plant?
LikeLike
Hi Lydia – I’ve managed to work it in the past so I kept some plants, but harvested most of the roots… I think with madder we will probably try and split it when we have enough, then rotate which we harvest. Jill Goodwin said that they used to harvest it every 5 years. I grew Lady’s Bedstraw just to experiment with getting a red dye, years ago, and it did well. I had a big garden lots of it…er… “wild”, so was able to grow some and leave some. The last time I did it, I was weeding someone else’s garden (I’m strange like that) and they wanted rid of the whole lot, so I obliged. When we have found stands of weld on grass verges or in abandoned plots – we have always been careful to take only a fraction and leave a lot to set seed for the following year. But with bedstraws it’s the spreading roots you’re after.
I realised after I put this post up, that I took the photo just showing the finer, hair-like roots I got at the start. A while after I took that shot, I got some slightly better roots – like very small worms. And that is what you really are after.
LikeLike