“I wish I was at home in my nice hole by the fire, with the kettle just beginning to sing!” It was not the last time that he wished that!
The Hobbit, J.R.R.Tolkien, 1937, Chapter 2.
Two years ago, I decided to do something not at all Living History, veering slightly into Cosplay. I decided to make one of my sons a version of Bilbo’s dressing gown, from ‘An Unexpected Journey’, the first film in ‘The Hobbit’ trilogy. Mainly because he’d made wistful remarks about wishing he had one. Also, because I wanted to make the Christmas presents for my older sons, to save money and so they would always have special things made for them, with love.

So I looked at sites to see who else had ventured into patchwork dressing gown territory and quickly realised surprisingly few people – even Tolkien geeks like myself – had done a similar project. All those online are lovely but where they seemed to miss the mark was in the colour tone/depth of hue – picking colours too bold, or light. I watched , re-watched and paused the scene with Bilbo wearing his dressing gown and started to analyse the designer’s colour choices. There were earthy tones of browns and burgundy, with some primrose yellow, pale but dull-ish blue, and dusky rose colours. All colours from nature. The printed fabrics also reflected hobbits’ love of nature; flowers and foliage.
Based on analysis of images from the movie, and other bloggers’ recommendations, I decided to go with making the gown using 2 squares and a rectangle – measured in inches because hobbits aren’t metric! The two squares would be 6” x 6” and 3” x 3”; the rectangle, 3” x 6”. I made templates from old plastic ice cream or margarine tubs, and added ½” seam allowance. I have a measuring gauge on the throat plate of my sewing machine (also pre-decimal because it’s on my 1956 Singer 221K) so I knew I could piece sort of accurately if I cut accurately and used the throat plate’s gauge.
When I started to piece the sleeves, laying out the patches on the cut-out lining, I compared my sleeve to the one in the film and realised there was no way the patches, the sizes recommended, would be right – far too large. So I revised them down to 16cm x 9cm and 9cm x 9cm, totally dropping the large squares. (Measurements include seam allowances. And I forgot to keep them imperial so when I re-make this, will revert to imperial!) Just counting down roughly the number of patches in the sleeves and body, from the movie’s version, it was apparent they were smaller than I’d thought.

I meant to do the sleeves like this and leave the body with larger patches, but when it came to it I realised the disparity in patch size from sleeves to body, would look a bit odd, so ended up re-cutting the oblongs and squares I’d already cut out, down to the smaller size. This doubled the amount of cutting out I had to do.
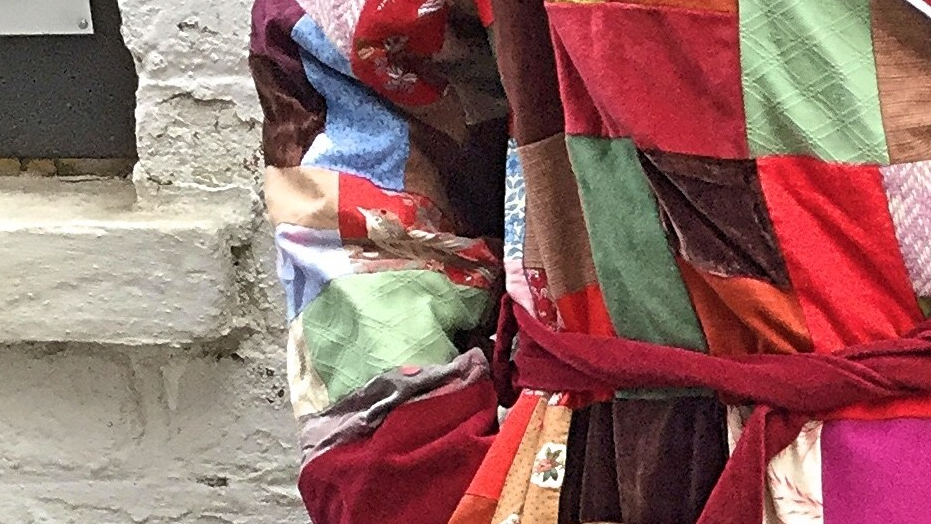
The original seemed to combine texture as well as colour; brocaded and other relief patterned fabrics, velvets and silks. Most of the other makers of replicas, so far, had stuck mainly with cottons – understandable as fat quarters are so readily available. But I was lucky, like a hobbit, to have a hoard of fairly rich looking silks and some brocades even a light green textured linen, from years of re-enactment and living history which meant I could incorporate texture, as well as colour, into my version. And yes, I’d happily make these on commission, but I’d have to figure out a fair price as it is incredibly labour intensive. Essentially you are designing and making a fabric, as well as a garment.
My self-imposed limitation was to only use up scraps I already had – so to make this for zero cost – with a rough colour criteria in my head as I sorted. I wanted this to cost as close to zero £s as possible and at the same time, use up scraps that had been lying around just in case, for years. Hopefully, we’d end up with a useful garment that would also clear a couple of bags of scraps from the airing cupboard.

So old patchwork fat quarters bought in a fit of enthusiasm a decade ago and never used; combined with recycled clothes and upholstery fabric and some living history fabrics were to be used. Surprisingly, my own palette wasn’t as far off the costume designer’s as I’d imagined it might be. Only think I lacked were rusty oranges/umbers. I resisted the temptation to buy any fabric. I knew somewhere I had the perfect offcut of burgundy velvet; but was unsure if I could lay my hands on it. So if I couldn’t find it, would have to buy that. And that was going to be my only expenditure. All threads I use as vintage; bought at car-boot sales. So I would use neutral cotton thread that came to hand. More than once in recent years, I was lucky enough to score huge boxes of 1950s – ‘70s threads at a car boot for derisory prices. For this project, I selected mainly ‘Silcarn’ brand and all the threads used had to be sound. Over many years of secondhand thread buying, I’ve noticed the threads that seem to degrade to the point they are unusable tend to be certain colours, which suggests their dyes are more corrosive – black and dark blues in particular. I always try and yank apart vintage cotton when I buy it and if it stays intact, I keep it – if it breaks easily, I discard.
Later, after I cut the squares, I sorted for depth of colour – ignoring each patch’s actual colour but sorting into two piles – darker and lighter. Then, when piecing each section, gave precedence to the darker patches, only using the lighter when darker ran out. In the end I used cottons, silk, linen, and the dark brown velvet was a recycled old smock-like top I’d had and not worn for years which turned out to be viscose and silk mix. There was a small amount of wool/cashmere leftover from a coat I made a couple of years back. I’d hoarded nice silk for years; leftovers from linings for re-enactment costumes and old tops I’d worn in ‘real life’ – if I got too fat for something made of silk – I never threw that out. Now the hoard came into its own. I can honestly say not a patch of this fabric is something I went out to buy; it was like something from The Shire, made from genuine scraps, leftovers and old clothing; not a single piece of the patchwork was something I went out to buy. All of it therefore pre-washed and shrunk, and some of it aged like fine wine.
There were some old fat quarters I’d cut into for a never-to-be-finished project. These were slightly too small for my smallest size patches, but I cut them into small squares anyway, and put them aside to use for the edges and shaping – particularly on the edges of the sleeves; determined not to waste a scrap. I used my vintage pinking shears – another £1 car-boot find – to cut fabric where I could, to minimise fraying.

Cutting out the squares – the first time – and rectangles took just over a day solid. I took apart an old dressing gown being determined not to spend a penny, not even on a pattern. This was one I was about to throw away anyway. The fleece was later recycled to make a cosy cat bed (after I unpicked half the dressing gown, laid it out flat, and used it to make a paper pattern). I could then make the lining and put it together first, before risking messing up the precious patchwork. I made a pocket in the lining. We slipped a repro ‘One Ring’ into it.
I laid out the patches roughly on each cut-out lining piece to make an approximate calculation of how many squares I’d need (adding on a rough extra 10% or so, for seam allowances between the patches). It looked like I’d need roughly 4 large, 20 medium and 20 small patches for the back.

I’d intended to use some burgundy velvet I knew I had somewhere, for the facing and cuffs but it stayed elusive so in the end, I had to relent and spend a bit of money. £12 on eBay for 2 metres of 100% cotton velvet, which, when it turned up was nice but not quite right right shade of ‘wine’. So back to eBay to buy some burgundy Procion dyes and fixative. Having to over-dye the velvet slowed the project down but it was already slowed down anyway, whilst I fixed the size of the patches. This gave me longer to arrange the patches on the front and constantly comparing to the Hobbit stills, I realised I needed a few more dusky rose colours and old golds as well as some olives. So a further raid of fabric stashes was done, more patches cut, and I was ready to finally piece the front. My mistakes had slowed me down enough to give me time to really figure out how to get the front as good as I possibly could. More haste, less speed. I pieced together bits of silk to make the piping round the edges, from scratch. Never made piping before but it was easy. To finish, I sewed a tag inside for him to hang it up and embroidered his initials in Dwarvish runes.
In the end, the burgundy dyes set me back under £10 which meant I spent less than £22 for the velvet edging; but ended up with enough for two dressing gowns meaning this one essentially cost £11. No doubt the burgundy velvet I knew I had will turn up again once I don’t need it.
In the end, son got this for Yule, 2015, but only just – so I had little time to photo it before I wrapped it up for him and we forgot to get a shot of him in it when he was home for Christmas. He went back to uni and we both kept forgetting to get shots of it.
In amongst the fabrics were some scraps of genuine 19thC printed cotton (mainly bird and flower prints) I bought in 2011 to make reticules as thank yous to Caro and Emma, for doing living history at Dove Cottage with us.

I’m blogging this now as I’m about to re-make it using a more 18thC shape for the gown (banyan). I’ll share the results here.
I wanted to go into detail on how I did this project as it is my favourite thing I ever sewed, and also – when I wanted to make one, there was a dearth of info out there so I had to largely wing it. Hopefully, this will help someone else tackle this project. Essentially, you need to draft or buy a dressing gown pattern, or pull apart an old dressing gown, or draft or buy an 18thC banyan pattern; then make panels of fabric (one for the back, two narrower for the front, and 2 for the sleeves). Then cut into the panels (reinforcing wherever you cut into by re-sewing) to create the shape. Then, sew together. The belt and edging were cotton velvet; the piping was homemade from silk, pieced by being cut straight not on the bias, which is how it was often done in the 18thC. It photographs almost white but is, in reality, much softer in hue.
I loved every second of this project, to the point I’m about to make another one, using the 18thC banyan pattern we drafted last year. This time, for myself. And mainly because I still have enough leftover scraps of various fabrics. My only regret with Bilbo’s Dressing Gown was that I didn’t make it from a banyan pattern, to give it more of an eighteenth century shape with a waist and flared out shape.
But anyway. I’m about to go there and back again – again. Wish me luck.


5 replies on “There And Back Again”
I love this project and the result, you ‘ve made a stunning piece!
I look forward to seeing your new version one day 🙂
Fabulous old stuff like the threads and old fabrics, too. I have a collection of old threads and spools myself
LikeLike
Thanks! I hesitated about using a couple of the fabrics, and then realised that was the point, in a way – to use them!
LikeLiked by 1 person
Yes, I agree! It’s easy to save up things for “one day” that will never come. Let’s use and enjoy them now!
LikeLike
What a beautiful thing!
I was once commissioned to make a Japanese kimono shaped dressing gown in crazy patchwork for a client. She wanted it to evoke a sense of Victorian patchwork meets willow pattern plate, so I used fat quarters in half a dozen blue and white Japanese Inspired cotton prints, did very much as you did and cut out a pattern in the lining fabric and laid out all the random patchwork pieces on to lining pieces. I then tacked all fabrics down (with edges turned under)and embroidered all the edges between the different fabrics with blue or white embroidery threads depending on what showed up best.
It was a labour of love but I was really pleased with the finished result. Such a shame it was in the days before mobile phones and digital cameras. I never got any photos of it!
LikeLike
Hi Janine
Would be lovely if your client saw this one day and sends you a shot of it!
I’d happily make these for sale but have no idea how to put a price on it – it took a lot of thought, and work and I have since often longed for one, myself, to the point I decided this year I’m going to do it!
LikeLike